In today’s world, artificial intelligence is at the forefront of technological innovation, with neural networks playing a pivotal role in this domain. Neural networks, inspired by the biological structure of the human brain, are powerful computational models that can solve complex problems by mimicking how neurons process and transmit information. Applications for neural networks span a wide range of industries, including image recognition, natural language processing, self-driving cars, and medical diagnosis, transforming the way we live and work.
Driven by my passion for technology, I couldn’t resist exploring the potential of neural networks and machine learning. This curiosity led me to dive deeper into this field, aiming to better understand the theory and practical applications of these technologies. To start, I read several articles that explained the fundamental concepts of neural networks, and after gaining some theoretical knowledge, I decided to apply this understanding to a practical project.
In this article, I will share my experience with neural networks, specifically focusing on the project I completed that centered around recognizing handwritten digits from 0 to 9.
Project Description:
In this particular project, I focused on recognizing handwritten digits ranging from 0 to 9. Handwritten digit recognition is a classic problem in the field of machine learning and computer vision, serving as an entry point for many enthusiasts who are beginning their journey into neural networks.
The Tools and Technologies:
To create the neural network for my handwritten digit recognition project, I utilized a variety of tools and technologies that facilitated the development and implementation of the model. Below is an overview of the key resources I used throughout the project:
1.Programming Language:
Python was my language of choice as it is the most popular language in the area of neural networks and therefore allows for the extensive support for machine learning and data manipulation libraries. Python’s wide adoption in the AI community also ensures a wealth of online resources and tutorials for tackling various challenges.
2.The Dataset – MNIST:
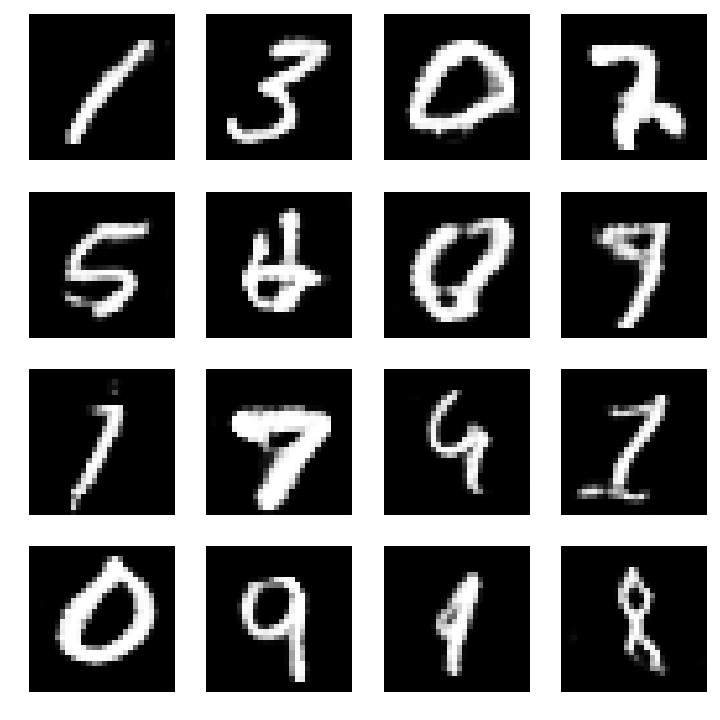
For my project, I utilized the MNIST (Modified National Institute of Standards and Technology) dataset. It comprises 70,000 grayscale images of handwritten digits, with each image being 28×28 pixels in size. The dataset is divided into 60,000 training images and 10,000 test images, which allows for the effective training and evaluation of machine learning models. Each image in the dataset is labeled with the corresponding digit it represents, ranging from 0 to 9
3.Frameworks:
I used TensorFlow and Keras for building and training my neural network. TensorFlow, developed by Google Brain, is an open-source machine learning library that provides a flexible platform for creating various types of neural networks. Keras, on the other hand, is a high-level neural network API that runs on top of TensorFlow. It simplifies the process of building and training neural networks, making it more accessible for beginners and allowing for rapid prototyping.
4.Libraries and Packages:
For data visualization, I used Matplotlib library.
The Model Architecture:
The architecture of the neural network for the handwritten digit recognition project was designed to effectively capture the essential features of the input images while keeping the complexity of the model manageable. Below is a description of the various components of the model:
1.Input Layer:
The input layer takes in the 28×28 pixel grayscale images of handwritten digits. These images are reshaped into a 4D tensor with dimensions (batch_size, 28, 28, 1) to accommodate the requirements of the convolutional layers.
2.Convolutional Layers:
The model features three convolutional layers with filter sizes of 3×3, and varying numbers of filters (32, 64, and 64 respectively). These layers learn to extract important features from the images, such as edges, curves, and patterns. A Rectified Linear Unit (ReLU) activation function is used in each of these layers to introduce non-linearity into the model.
3.Pooling Layers:
Two MaxPooling layers with a 2×2 pool size are added after the first and second convolutional layers. These layers reduce the spatial dimensions of the input, helping the model focus on the most relevant features while also reducing computational complexity and preventing overfitting.
4.Flatten Layer:
A Flatten layer is included to convert the output from the last convolutional layer into a 1D array, preparing it for input into the fully connected layers.
5.Fully Connected (Dense) Layers:
The model has two fully connected layers. The first layer has 64 nodes and uses a ReLU activation function to further process the extracted features. The second layer has 10 nodes (one for each digit from 0 to 9) and uses a softmax activation function to produce probability distributions for the digit classifications.
6.Optimization Algorithm and Loss Function:
To train the model, an ‘adam’ optimizer is used, which is an adaptive learning rate optimization algorithm well-suited for training deep neural networks. The loss function used in the model is ‘categorical_crossentropy,’ which is ideal for multi-class classification problems. This loss function calculates the error between the predicted probability distribution and the actual one-hot encoded labels, guiding the model to adjust its weights to minimize the error.
Training and Testing the Model:
Having prepared the data and designed the model architecture, the next step was to train the model. The training process involves showing the model the training data and allowing it to iteratively make predictions. For each prediction, the model calculates how far off it was from the actual result, using a mathematical function known as a “loss function”. It then adjusts its internal parameters in a way that makes it slightly less wrong the next time.
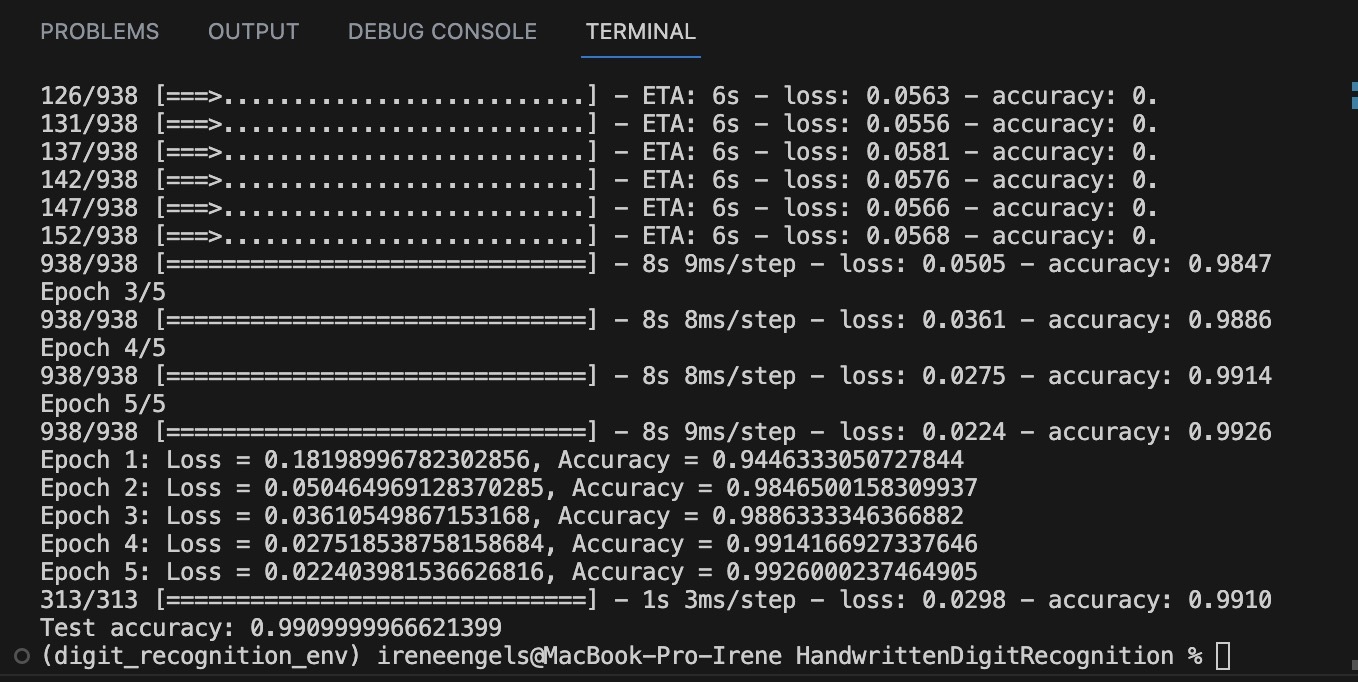
In this case, I trained the model for 5 epochs. An epoch is a full pass over the entire training dataset. Each epoch consisted of 938 steps, corresponding to the 938 batches of 64 images each in the training data.
Here’s a summary of the training progress:
- Epoch 1: Loss = 0.1783, Accuracy = 94.57%
- Epoch 2: Loss = 0.0516, Accuracy = 98.40%
- Epoch 3: Loss = 0.0373, Accuracy = 98.82%
- Epoch 4: Loss = 0.0282, Accuracy = 99.09%
- Epoch 5: Loss = 0.0228, Accuracy = 99.24%
As you can see, the model’s loss decreased with each epoch, indicating that it was getting better at predicting the correct digit labels with each pass over the data. Similarly, the accuracy of the model’s predictions increased with each epoch.
Once the model was trained, I tested it on the testing dataset to evaluate its performance on new, unseen data. The loss on the testing dataset was 0.0319, and the model achieved an accuracy of 98.92%. This high accuracy confirms that the model learned to recognize handwritten digits effectively and was able to generalize well from the training data to unseen data in the testing set.
Training and testing the model was a pivotal stage in the project. Observing how the model learned from the data and improved its predictions with each epoch was both fascinating and rewarding. As a result of my efforts, I now have a model that can accurately recognize handwritten digits from 0 to 9.
Future Usage and Deployment of the Trained Model:
Having built and trained a model to successfully recognize handwritten digits, one of the most rewarding next steps is applying this model in real-world scenarios. The versatility of machine learning models lies in their ability to be saved, shared, and deployed across different platforms, hence extending their usability beyond the initial environment where they were developed.
In TensorFlow, you can save the entire model in the HDF5 format or the SavedModel format. The latter is more comprehensive and includes a TensorFlow checkpoint containing the model weights, as well as the model architecture, and optimizer configuration. This is done using the model.save() function. Once the model is saved, you can load it in a different Python script (or even on a different machine) and use it to make predictions, evaluate on new data, or even continue training.
The real power of saving models, though, is the ability to deploy them in various applications. For example, you can use your model in an Android or iOS application, or in a web application, enabling users to interact with it directly. There are various ways to do this.
For web applications, TensorFlow.js can be used to load and run models in a browser. TensorFlow.js provides utilities to save and load models directly from browsers’ LocalStorage or IndexedDB. Models can also be served from a static HTTP/HTTPS server, or from cloud storage platforms like Google Cloud Storage.
For mobile applications, TensorFlow Lite allows you to deploy TensorFlow models on mobile and IoT devices. The models are lightweight and have low latency to enable on-device machine learning. The TensorFlow Lite converter creates a .tflite file from a SavedModel.
In this way, the model I’ve trained for handwritten digit recognition can be saved and then deployed in various contexts – be it a web app that digitizes handwritten notes, or a mobile app that uses a device’s camera to recognize handwritten digits in real time. The possibilities are numerous and limited only by one’s imagination and ingenuity.
Authored by Iryna Engels.